on
Tennis Ball Detection
테니스 공 인식하는 과정을 포스팅할 것이다. 아래는 포스팅에 진행될 영상처리 과정이다.
- 차영상
- 이진화처리
- 컬러처리
- 메인 프로세싱 및 특징 처리
개발환경
- PC: Mac mini M1
- OS: macOS Big Sur
- Lang: Python
- Package: opencv-python, numpy
인식 범위를 낮추자.
영상처리의 가장 어려운 점은 모든 상황에서 일반적으로 동작하기가 매우 어렵다. 다양한 환경 요소들이 등장할 수도 있고 잘못된 오인식의 시작으로 모든 인식과정이 틀어질 확률이 매우 높다. 그래서 영상처리 개발 전에는 어떤 환경인지와 필요한 제한사항을 두어 인식의 Scope를 최대한 줄여야한다. 되도록 사용자에게 정확한 인식을 위한 가이드 라인을 주는 것이 좋다.
우리는 아래와 같은 가이드 라인을 사용자에게 요구할 것이다.
- 촬영되는 테니스 코트의 각도는
특정 범위내에 들어와야한다. - 테니스 코트가 조금이라도 다 나올 수 있도록 촬영 위치를
고정한다. - 테니스 코트의
라인들은 되도록부분적으로나마 나올 수 있도록 한다. - 동영상의
시작은 테니스플레이로부터 시작되게 한다. - 동영상을 진행하는 동안의 촬영 위치는
고정으로 진행된다.
위의 가이드 라인 있다면 짧은 시간 안에 프로토타입 정도의 개발이 가능해진다. 여기서 한줄씩 가이드 라인을 지울 수 있도록 개선하는 것이 해당 프로젝트의 기술력이라고 할 수 있겠다.
Diff image
 카메라가 지속적으로 고정되는 상황이라면 움직이는 사물을 제외하고는
 고정된 물체나 배경들은 제거해주는 것이 좋다.
가장 쉬운 방법은 영상의 시간별로 차영상을 구해 고정된 사물이나 배경들을 제거해주는 것이다.
back_sub = cv.createBackgroundSubtractorMOG2(varThreshold=200, detectShadows=False)
def get_diff_image(frame):
    diff = back_sub.apply(frame) # [w, h, 1]
    return diff
Binarization
 차영상의 결과물은 0~255사이의 값을 가진다. 우리는 정보의 표시를
 단순화 시킬 필요성이 있다.
비트의 0 또는 1과 같이 검정(0)과 흰색(255)의 값을 가지는 이진화 영상으로 만들자.
def get_binary_image(frame):
    diff = get_diff_image(frame)
    blur = cv.GaussianBlur(diff, (7, 7), 0)
    _, binary = cv.threshold(blur, 0, 255, cv.THRESH_BINARY | cv.THRESH_OTSU)
    return binary
영상에 가우시안 블러하여 Low-pass fitler처리를 해주면 이진화 작업 시 발생되는 잡음들을 제거해줄 수 있다.
자세한 설명은 영상의 주파수 관련된 부분을 공부하면 쉽게 이해할수 있다.
Color Selection
우리가 영상에서 가져올 테니스 공은 녹색 계열의 색상을 가지고 있다.
이는 차영상에서 발생할 수 있는 테니스공 외의 다른 움직임을 제거해줄 수 있는 역할을 수행할 수 있다.
def get_color_mask(frame, color):
    converted = cv.cvtColor(frame, cv.COLOR_BGR2HSV)
    if color == 'green'
        _lower = np.uint8([30, 0, 100])
        _upper = np.uint8([90, 255, 255])
    return cv.inRange(converted, _lower, _upper)
변환되는 영상은 RGB가 아닌 HSV Color Model이다.
HSV는 원색 컬러의 기준에서 채도의 변화에 따른 Range가 RGB 모델 보다 효율적인 범위를 가진다.
Preprocessing
위의 3가지 방법을 순차적으로 연산하여 전처리 과정을 수행하자
def preprocessing(frame)
    binary = get_binary_image(frame)
    masked = get_color_mask(frame, 'green')
    masked = cv.bitwise_and(masked, masked, mask=binary)
    return masked
binary 와 masked는 0 과 255의 값을 가진 이진화된 영상이다.
and 연산을 통해 두 영상에 True에 해당하는 점들을 찾아내자
Ball Feature
입력되는 이미지에서 공의 특징을 보고 공인지 판별하는 함수를 작성해보자
간단히 마스크 이미지에서 갖는 공의 특성은 아래와 같다.
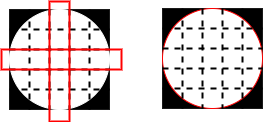
- 수직의 정중앙의 특정 구간은 공 부분의 면적에
포함된다. - 수평의 정중앙의 특정 구간은 공 부분의 면적에
포함된다. - 전체 이미지의 넓이에서 공이 차지하는 부분은
절반이상을 가진다.
구현은 다음과 같다.
def is_ball(masked):
    """
    Paramter:
        - masked : 이진화 처리된 부분 이미지
    """
    height, width = masked.shape[:2]

    dy = int(height/5) # 수직으로 1/5 등분한다.
    y = dy * 2 # 수직의 시작점 (| | |O| | |)
    row_area = masked[y : y + dy, 0 : 0 + width] # sub masked

    dx = int(width/5) # 수평으로 1/5 등분한다.
    x = dx * 2 # 수평의 시작점
    col_area = masked[0 : height, x : x + dy] # sub masked

    _row = cv.countNonZero(row_area)
    _col = cv.countNonZero(col_area)
    _all = cv.countNonZero(masked)

    # 수직의 정중앙의 특정 구간은 공 부분의 면적에 포함된다.
    if not 0.1 < (_row / _all) < 0.5:
        return False
    # 수평의 정중앙의 특정 구간은 공 부분의 면적에 포함된다.
    if not 0.1 < (_col / _all) < 0.5:
        return False
    #전체 이미지의 넓이에서 공이 차지하는 부분은 절반 이상을 가진다.
    if ( _all / (width * height) ) < 0.5:
        return False

    return True
Main Processing
마지막으로 위의 함수들을 종합하여 최종적으로 테니스 볼 디텍션을 수행해보자 메인에서는 전처리가 완료된 이미지에서 각 영역별로 묶어주는 coutour 함수를 실행하고 각 coutour를 위 볼 판별 함수에 넣어 아닌것 들을 제거 해내는 과정을 진행할 것이다.
def processing(frame):
    masked = preprocessing(frame)

    # Find contour
    coutours, _ = cv.findContours(masked, cv.RETR_CCOMP, cv.CHAIN_APPROX_SIMPLE)

    balls = []
    for contour in coutours:
        rx, ry, rw, rh = cv.boundingRect(contour)
        detected = masked[ry : ry + rh, rx : rx + rw]
        if is_ball(detected): # and recognize(detected):
            balls.append((rx+rw/2, ry+rh/2, rw/2)) # (x, y, z)

    return balls
최종적으로 검출된 볼을 화면에 그려주면
balls = processing(frame)
for ball in balls:
    x, y, r = ball
    frame = cv.circle(frame, (int(x), int(y)), radius=int(r), color=[0, 0, 255])
return frame
recognize(detected)는 딥러닝 인식기로서 만약 해당 위치에 추가해 준다면 테니스공 인식에 있어 더욱 성능이 좋아질 것이다.
For debugging
영상처리는 디버깅시 중간중간 영상 상황을 봐야할 경우가 생긴다.
아래와 같이 각 함수 특성에 맞게 만들어 준다면 편하게 확인이 가능할 것이다.
def get_image(name, frame):
    if name == 'get_diff_image':
        return get_diff_image(frame)
    if name == 'preprocessing':
        return preprocessing(frame)
    if name == 'processing':
        balls = processing(frame)
        for ball in balls:
            x, y, r = ball
            frame = cv.circle(frame, (int(x), int(y)), radius=int(r), color=[255, 0, 0], thickness=2)
        return frame
Class화
차영상에서 사용한 createBackgroundSubtractorMOG2 함수는 지속적으로 변수를 유지시켜줘야한다.
때문에 위 전체 과정을 클래스화 시켜두면 외부에서의 사용이 용이해질수 있을 것이다.
아래는 완성된 코드이다.
import cv2 as cv
import numpy as np
class TennisBallDetection:
    def __init__(self):
        self.back_sub = None
        self.__init()

    def __init(self):
        self.back_sub = cv.createBackgroundSubtractorMOG2(varThreshold=200, detectShadows=False)

    def get_diff_image(self, frame):
        diff = self.back_sub.apply(frame) # [w, h, 1]

        return diff

    def get_binary_image(self, frame):
        diff = self.get_diff_image(frame)

        blur = cv.GaussianBlur(diff, (7, 7), 0)
        _, binary = cv.threshold(blur, 0, 255, cv.THRESH_BINARY | cv.THRESH_OTSU)
        return binary

    def get_color_mask(self, frame_3d, color):
        converted = cv.cvtColor(frame_3d, cv.COLOR_BGR2HSV)
        if color == 'green':
            _lower = np.uint8([30, 0, 100])
            _upper = np.uint8([90, 255, 255])
        return cv.inRange(converted, _lower, _upper)

    def preprocessing(self, frame):
        binary = self.get_binary_image(frame)
        masked = self.get_color_mask(frame, 'green')
        masked = cv.bitwise_and(masked, masked, mask=binary)
        return masked

    def processing(self, frame):
        masked = self.preprocessing(frame)

        # Find contour
        coutours, _ = cv.findContours(masked, cv.RETR_CCOMP, cv.CHAIN_APPROX_SIMPLE)

        balls = []
        for contour in coutours:
            rx, ry, rw, rh = cv.boundingRect(contour)
            detected = masked[ry : ry + rh, rx : rx + rw]
            if self.__is_ball(detected): # and recognize(detected):
                balls.append((rx+rw/2, ry+rh/2, rw/2)) # (x, y, z)

        return balls

    def apply(self, frame):
        return self.processing(frame)


    def get_image(self, name, frame):
        if name == 'get_diff_image':
            return self.get_diff_image(frame)
        if name == 'preprocessing':
            return self.preprocessing(frame)
        if name == 'processing':
            balls = self.processing(frame)
            for ball in balls:
                x, y, r = ball
                frame = cv.circle(frame, (int(x), int(y)), radius=int(r), color=[255, 0, 0], thickness=2)
            return frame


    def __is_ball(self, masked):
        """
        Paramter:
            - masked : 이진화 처리된 부분 이미지
        """
        height, width = masked.shape[:2]

        dy = int(height/5) # 수직으로 1/5 등분한다.
        y = dy * 2 # 수직의 시작점 (| | |O| | |)
        row_area = masked[y : y + dy, 0 : 0 + width] # sub masked

        dx = int(width/5) # 수평으로 1/5 등분한다.
        x = dx * 2 # 수평의 시작점
        col_area = masked[0 : height, x : x + dy] # sub masked

        _row = cv.countNonZero(row_area)
        _col = cv.countNonZero(col_area)
        _all = cv.countNonZero(masked)

        # 수직의 정중앙의 특정 구간은 공 부분의 면적에 포함된다.
        if not 0.1 < (_row / _all) < 0.5:
            return False
        # 수평의 정중앙의 특정 구간은 공 부분의 면적에 포함된다.
        if not 0.1 < (_col / _all) < 0.5:
            return False
        #전체 이미지의 넓이에서 공이 차지하는 부분은 절반이상을 가진다.
        if ( _all / (width * height) ) < 0.5:
            return False

        return True


import cv2 as cv
import numpy as np
def test_ball_detection(input_vide_path: str = '', debug=False):
    video = cv.VideoCapture(input_vide_path)

    while True:
        ret, frame = video.read()
        if not ret: break

        detect = TennisBallDetection()
        balls = detect.apply(frame)
        if debug:
            frame = detect.get_image('processing', frame)
            cv.imshow('debug', frame)
    ...
…
높은 성능을 기대하지 않았으면 한다. 아무래도 테니스 영상의 특성상 외부 요인들이 많다
예를들어 바람이 불어 카메라가 흔들린다면 인식률과 속도가 현저히 떨어질 것이다.
물론 딥러닝으로 end-to-end detection이 충분히 가능하다. 하지만 짧은 개발 기간과 환경을 고려한 처리 방법이기에 이를 염두해두길 바란다.
좋은 성능을 위해 개선할 부분을 뽑으면 다음과 같다.
- 볼의 특성을 조금 더
디테일하게 작성하는 부분 딥러닝인식기를 임포트 하여 도입하는 방법
다음 포스팅은 Detected ball을 frame 별로 추적하는 알고리즘을 간단히 구현해 볼 것이다.